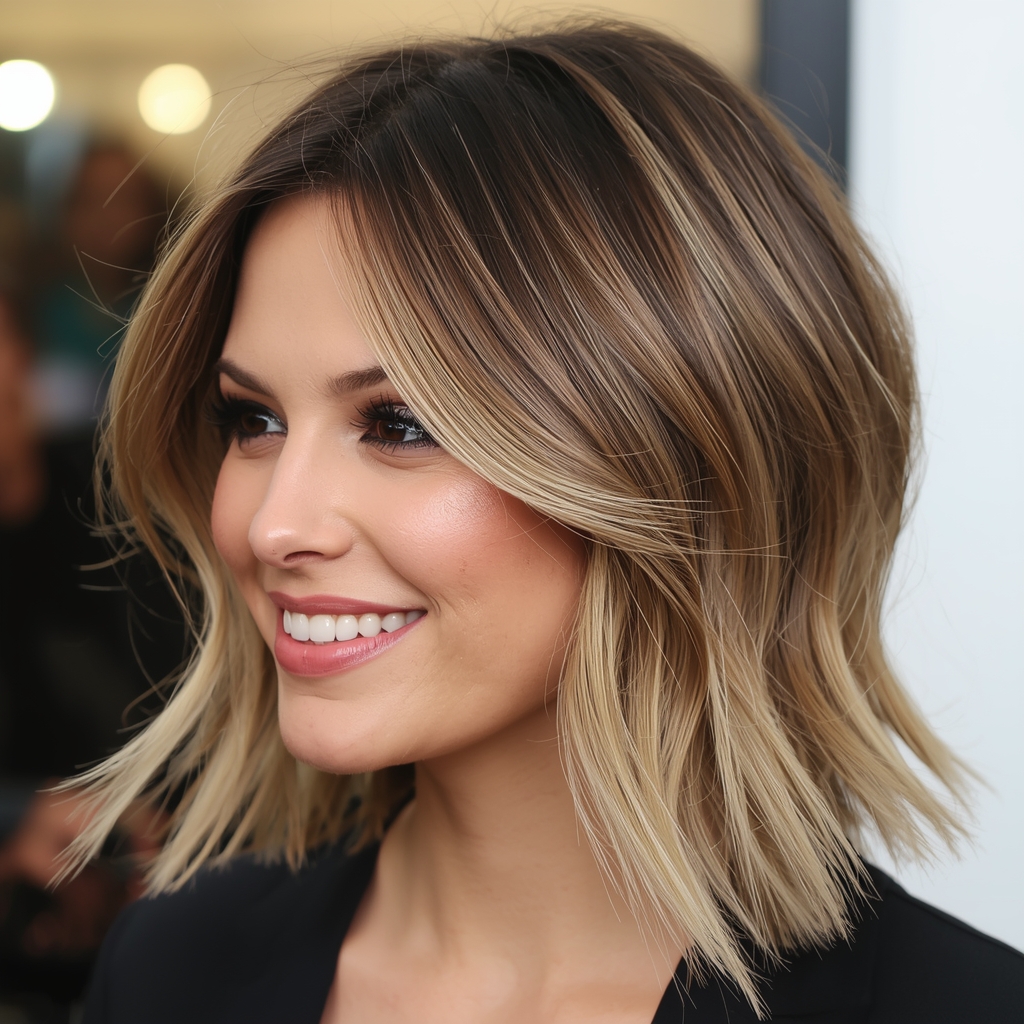
In the world of high-end hairstyling, there is one technique that acts as the ultimate “secret weapon” for stylists and clients alike. It isn’t a radical color change or an expensive chemical treatment; rather, it is the strategic placement of face-framing layers.
Often described as “hair contouring,” face-framing layers are designed to highlight your best features, soften strong angles, and add a sense of movement and “expensive” texture to even the most basic haircut. Whether you are sporting a waist-length mane or a chic shoulder-length lob, face-framing layers are the bespoke touch that transforms a standard trim into a personalized style statement.
In this definitive guide, we will explore the science behind face-framing layers, how to customize them for your unique facial structure, and the professional styling secrets required to maintain that “just-stepped-out-of-the-salon” finish.
What are Face-Framing Layers?
Face-framing layers are shorter strands of hair cut specifically around the perimeter of the face. Unlike “all-over layers,” which are distributed throughout the entire head to remove weight and add volume, face-framing layers are localized. They begin somewhere between the brow and the jawline and cascade downward to blend seamlessly into your overall length.
The goal of these layers is twofold:
-
Architecture: To create a “frame” for the eyes, cheekbones, and jaw.
-
Fluidity: To break up the “curtain” of long hair, preventing it from dragging down your features and instead providing a lifting, youthful effect.
The Psychology of the “Big Chop” Alternative
For many clients, the desire for change is tempered by a fear of losing length. This is where face-framing layers shine. They offer a significant visual transformation without sacrificing the “security blanket” of long hair. By simply changing the way the hair interacts with the face, a stylist can make a client feel like they have an entirely new identity while keeping their ponytail exactly the same length.
Face Shape Geometry: Customizing the Frame
A professional stylist does not cut face-framing layers with a “one-size-fits-all” mentality. The starting point and the angle of the cut are determined by the geometry of your face.
1. Round Faces
The goal for a round face is to create the illusion of length and to “narrow” the cheek area.
-
The Technique: Layers should start below the chin. If they start at the cheekbones, they will add width, which can make the face appear rounder. By starting the layers lower, you create vertical lines that elongate the silhouette.
2. Square and Rectangular Faces
For those with strong, angular jawlines, the goal is “softening.”
-
The Technique: Layers should be cut with a feathered, wispy finish rather than blunt ends. Starting the layers at the cheekbones helps to round out the sharp angles of the jaw, creating a more balanced, oval appearance.
3. Heart-Shaped Faces
Heart faces are characterized by a wider forehead and a narrower, sometimes pointed chin.
-
The Technique: To balance this shape, layers should start around the chin and “flick” outward. This adds volume to the lower half of the face, filling out the space around the chin and balancing the wider forehead.
4. Oval Faces
Oval faces are considered the “universal canvas.”
-
The Technique: Almost any length works here. However, to truly highlight an oval face, stylists often recommend starting the layers at the cheekbones to draw attention to the eyes and the center of the face.
Popular Variations: From 90s Blowouts to Modern Shags
Face-framing layers have been a staple of every major hair era. Today, we see three primary variations dominating the trend cycle:
The “90s Butterfly” Layering
Inspired by icons like Cindy Crawford and Jennifer Aniston, this look features heavy, voluminous layers that are blown out away from the face. The face-framing pieces are often cut to be quite short (around the nose or chin) to allow for maximum lift and “swoop.”
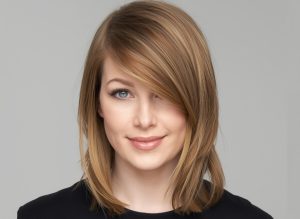
The “Gateway” Curtain Bang
Technically a form of face-framing layering, curtain bangs are the most requested addition to long hair. They sit at the brow or cheekbone and “curtain” open to frame the eyes. They provide an instant style update and are the perfect way to test out layers if you’ve previously had a one-length cut.
The “Invisible” or Seamless Frame
For the “Quiet Luxury” aesthetic, stylists use a technique called slide cutting. This involves sliding open shears down the hair shaft while it is dry. The result is a layer that has no visible starting or ending point—just a soft, graduated flow of hair that removes bulk and adds subtle movement.
Hair Texture: Will It Work for You?
Straight Hair: Face-framing layers on straight hair add much-needed dimension. Without them, straight hair can sometimes look “flat” or “heavy.” The layers create a “staircase” effect that catches the light and adds visual interest.
Wavy and Curly Hair: For those with natural texture, face-framing layers are essential to prevent the “triangle hair” effect (where the hair poofs out at the bottom). Layers allow curls to “stack” and frame the face, giving the hair a beautiful, rounded shape. Stylists often recommend cutting these layers while the hair is dry to ensure the curls sit exactly where they are intended.
Professional Styling Secrets
The hallmark of great face-framing layers is how they “flick” and “swoop.” To achieve this at home, you need the right tools and a specific technique.
-
The Over-Directed Blow-Dry: When drying your face-framing layers, use a round brush. Pull the hair forward toward your nose and wrap it around the brush, then dry it. When you release the hair and flip it back, it will have a perfect, voluminous “sweep” away from the face.
-
The Flat Iron “C-Curve”: If you prefer using a straightener, take the face-framing sections and twist the iron in a “C” shape away from your face as you glide it down. This creates a soft, polished wave that highlights the graduation of the cut.
-
Product Selection: Use a lightweight volumizing mousse on damp hair to provide “hold” for the layers. Finish with a dry texturizing spray—this is the secret to getting that piecey, separated look that makes the layers visible and dynamic.
Communication: How to Ask Your Stylist
The biggest mistake clients make is being vague about where they want their layers to start. To ensure you get the look you want, use these professional tips:
-
Bring Reference Photos: A picture is worth a thousand words, but pay attention to the hair texture in the photo. If you have pin-straight hair, showing a photo of a curly shag might lead to a cut that requires more daily styling than you’re prepared for.
-
Identify the “Starting Point”: Use your features as a guide. Say, “I want my shortest layer to hit my cheekbone,” or “I want the layers to start right at my jawline.”
-
Mention “Blended” vs. “Disconnected”: Do you want your face-framing pieces to blend seamlessly into the rest of your hair (blended), or do you want them to stand out as a distinct “step” (disconnected/70s style)?
Maintenance: Keeping the Frame Sharp
Because face-framing layers sit right in your line of vision and are the first thing people notice, they require slightly more maintenance than a blunt cut.
-
Trims: Expect to visit the salon every 6 to 8 weeks. As these layers grow out, they can lose their “lift” and start to weigh down your features.
-
Color Synergy: Face-framing layers are the perfect partner for The Money Piece—a color technique where the strands closest to the face are lightened. The combination of shorter layers and brighter color provides a double-whammy of facial highlighting.
Conclusion
Face-framing layers are more than just a haircutting technique; they are a form of artistic expression. They allow a woman to wear her hair as an accessory that specifically enhances her unique beauty. Whether you want to hide a wide forehead, highlight a killer set of cheekbones, or simply add some “va-va-voom” to your daily look, face-framing layers are the answer.
By understanding the geometry of your face and communicating clearly with your stylist, you can achieve a look that is both timeless and perfectly on-trend. It’s time to stop hiding behind a curtain of hair and start using your hair to frame the masterpiece that is your face.
Leave a Reply